Skills
Projects are composed of Subjects which are made of Skills (or Skill Groups) and a single skill defines a training unit within the gamification framework. To complete a skill, users may need to perform the same action multiple times - repetition is important for retention after all. A Skill definition specifies how many times a skill has to be performed. Each occurrence is called a Skill Event.
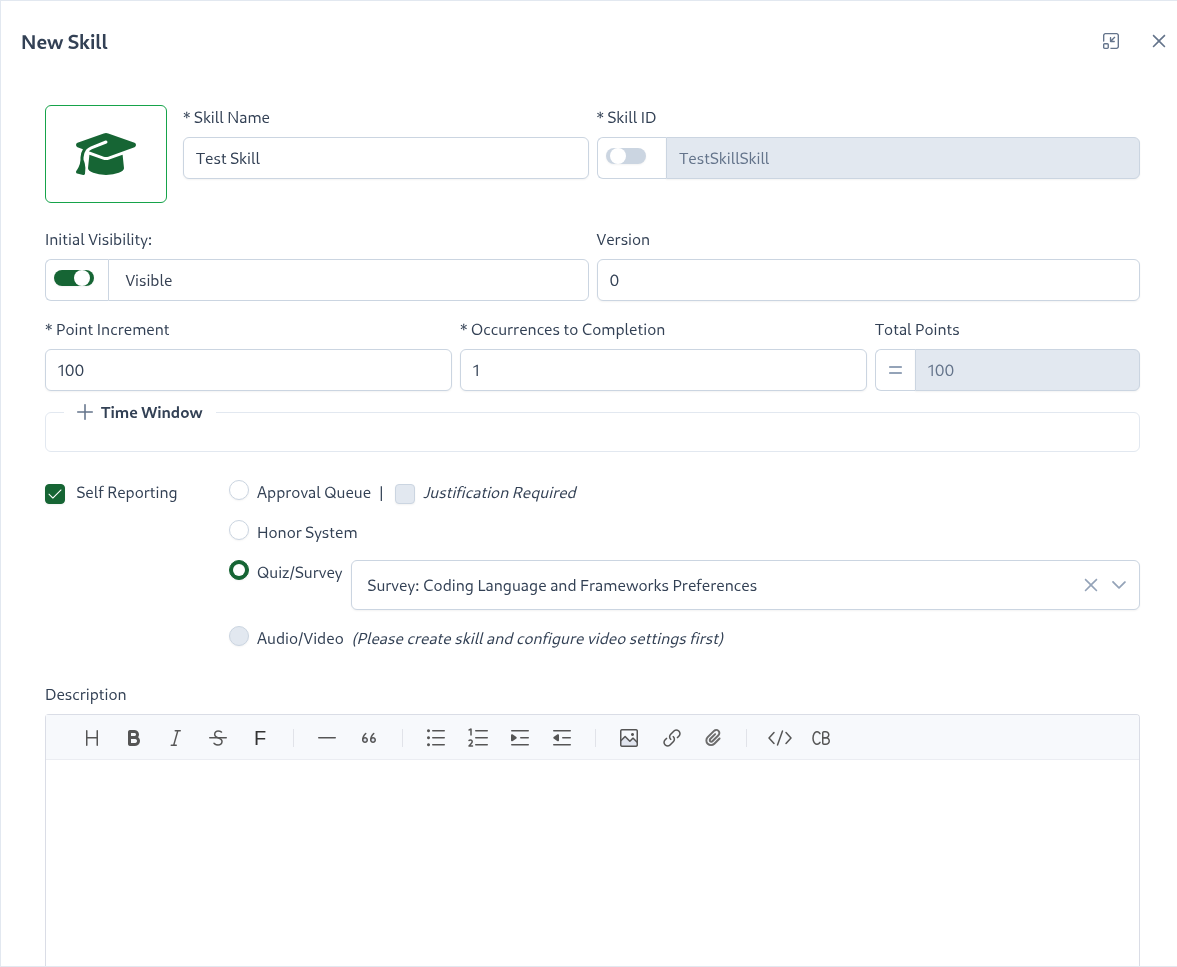
To create a skill, navigate to Project -> Subject then click on Skill +, the following skill properties can be specified:
Tips
Did you know, you can use SkillTree's AI Assistant to generate descriptions, Learn more
| Property | Explanation |
|---|---|
| Skill Icon | Icon associated with the skill to be presented on the training pages |
| Skill Name | Display name of the skill |
| Skill ID | Skill ID that will be used to report skill events |
| Initial Visibility | If the skill is initially visible or hidden. Hidden skills will not be visible to trainees effectively keeping the skill in a draft mode until it is ready to be exposed. |
| Point Increment | Number of points added for each skill event; used in conjunction with the 'Occurrences to Completion' property |
| Occurrences to Completion | Number of successful occurrences to fully accomplish this skill; used in conjunction with the 'Point Increment' property |
| Time Window | Used in conjunction with the 'Max Occurrences Within Window' property; once this Max Occurrences is reached, points will not be incremented until outside of the configured Time Window. When 'Time Window' is disabled skill events are applied immediately." |
| Max Occurrences Within Window | Used in conjunction with the Time Window property; Once this Max Occurrences is reached, points will not be incremented until outside of the configured Time Window. |
| Self Reporting | (Optional) When checked Self Reporting is enabled for this skill. The type of Approval Queue, Honor System or Quiz/Survey can then be selected. When choosing Approval Queue, you may also choose to require users to submit a justification when self-reporting this skill by selecting the 'Justification Required' check box. When selecting Quiz/Survey you will also be prompted to pick an existing Quiz or a Survey. Please visit Self Reporting to learn more. |
| Version | (Optional) Utilize Skills Versioning to support running multiple versions of client software |
| Description | (Optional) Description of how to perform this skill. |
| Help URL/Path | (Optional) URL pointing to a help article providing further information about this skill or capability. Please note that this property works in conjunction with the Root Help Url project setting. You can also author external links into the description itself if more than one external resource needs to be linked to. |
Tips
To calculate the total points that completion of a particular skill will give a user:
Total Points = Point Increment * Occurrences to Completion
Skill Creation Lifecycle
Skills can be created with their Initial Visibility set to Hidden. When hidden, skills remain invisible to trainees until the Initial Visibility is switched to Visible. This feature allows you to keep skills in draft mode until they are ready for trainee access.
Tips
Once a skill becomes visible, it cannot be hidden again. The Initial Visibility control will be removed from the interface.
Hidden skills have specific constraints and cannot:
- Be added to the Skills Catalog
- Be added to a badge
- Be added to a Learning Path
- Be reused within the project
Hidden skills can be:
- Moved to another subject or group
- Copied within a project or to another project
Tips
- You can also create hidden subjects, please visit Subject Creation Lifecycle section to learn more.
- Visible skills cannot be added or moved to a hidden subject
Time Window
Time Window is a powerful feature that limits awarding of points to a maximum number of occurrences within the configured time span. This feature provides a balance between requiring repetition of an action and spacing out that repetition.
“Repetition is the mother of learning, the father of action, which makes it the architect of accomplishment.” - Zig Ziglar
When designing a gamification profile, the Time Window must be considered in conjunction with the Occurrences to Completion property. For example, you may want to require 30 occurrences to complete a skill but only up to 5 occurrences within a 24 hour window. This means that it will take a user at a minimum, 6 days to complete this skill. Here are the properties for this hypothetical example:
- Occurrences to Completion: 30
- Time Window: 24 hours 0 minutes
- Max Occurrences Within Window: 5
This is just a fictitious example and values will depend on your gamification needs.
You can also disable the Time Window property of a Skill, which will force each event to be applied immediately (up to Occurrences to Completion). To disable, uncheck the checkbox next to the Time Window property.
Best Practices
- "Repetition is the mother of learning" - use the
Occurrences to Completionproperty in conjunction with the Time Window property to balance between requiring repetition of an action and spacing out that repetition (for example, prevent users from spamming an action in one sitting to max out a Skill by setting a Time Window of 1-8 hours) - Help Url - configure the Root Help Url for the project and then enter a path relative to that root. It will then be an easy change if the location of help articles changes. You can also author external links into the description itself if more than one external resource needs to be linked to. ``
Slide Deck
SkillTree enables seamless integration of PDF-based slide decks directly into skills, allowing you to enhance training materials with professionally designed presentations created in tools like PowerPoint and exported as PDFs.
You have two methods to add slide decks:
- SkillTree Hosted: Upload PDF files directly using the file upload form (Browse button) or via drag-and-drop
- Externally Hosted: Provide a URL to a PDF hosted on an external web server (e.g., https://example.com/slides.pdf)
To set up a slide deck, navigate to Project -> Subject -> Skill -> Slides and upload your PDF file.
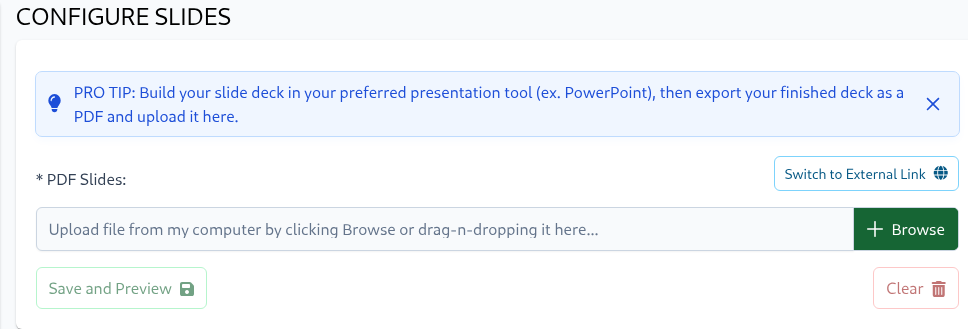
To upload slides from your computer, click the Browse button or drag and drop a file into the upload area. For externally hosted slides, click "Switch to External Link" and enter the file's URL. Don't forget to click "Save and Preview" to save your changes.
A preview will appear in the Preview section once configured.
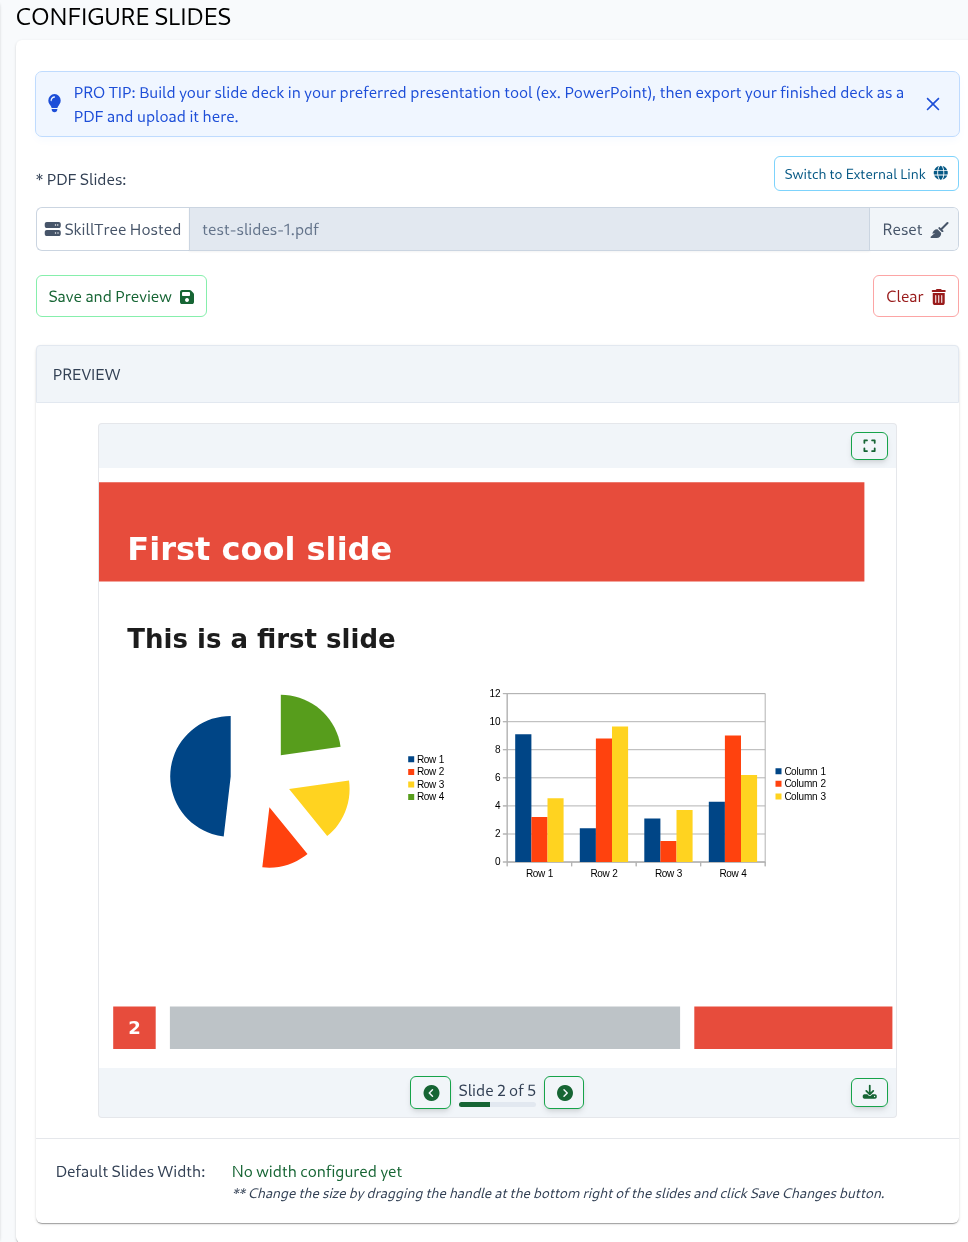
The built-in slide viewer offers:
- Intuitive navigation between slides
- PDF download capability
- Full-screen presentation mode
- Slide resizing (drag the bottom-right corner)
Tips
Resize slides by dragging the handle in the bottom-right corner. Click "Save Changes" to apply the new dimensions. Trainees can also adjust slide sizes to their preference. These custom settings are automatically saved in the browser's local storage and will override the default dimensions.
In full-screen mode, users can:
- Navigate using
left/rightarrow keys - Access navigation controls by hovering near the bottom
- Exit using the
Escapekey or the exit button in the navigation controls
Audio/Video
SkillTree allows embedding videos or audios clips into skill descriptions, with optional configuration settings to achieve the skill upon full playback.
Videos
You can either embed externally hosted videos or upload videos directly to SkillTree.
- SkillTree Hosted: Upload videos using the file-upload form (Browse button) or by drag-and-dropping video files
- Externally Hosted: Enter a URL that points to a video hosted on another web server (e.g.,
https://example.com/video.mp4)
To configure a video, please navigate to Project -> Subject -> Skill -> Audio/Video
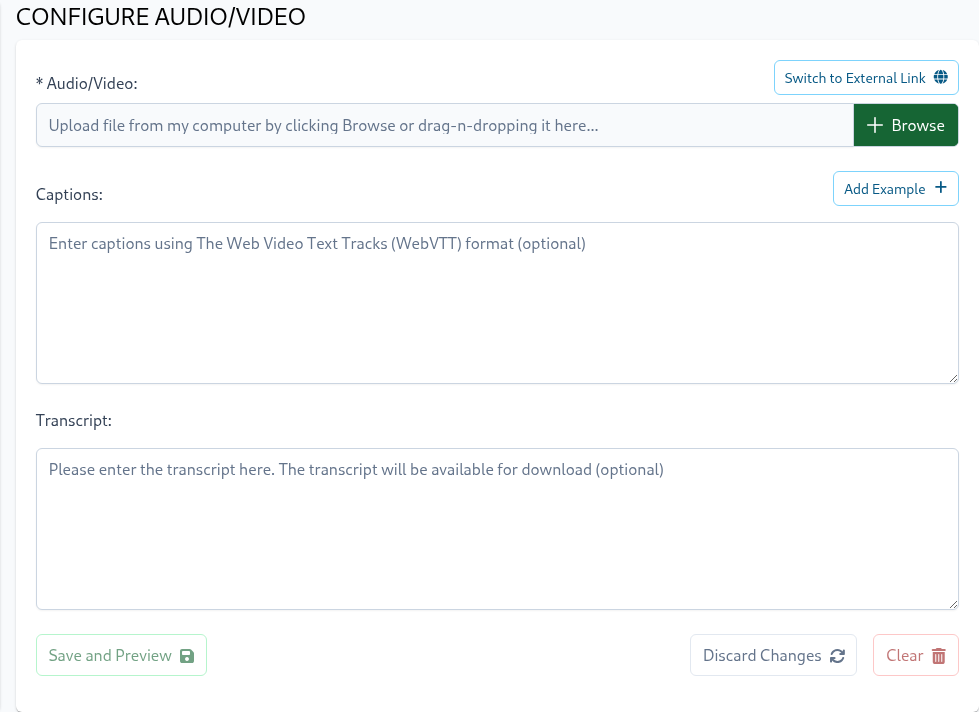
The only required field is Video and once the video is configured it will be presented on the training page above the skill's description.
To upload a video from your computer you can click on the Browse button or drag-n-drop a video file into the video input box. To configure an externally hosted video click on the Switch to External Link button and then enter the URL that points to the externally hosted video. Please do not forget to click Save and Preview button to persist the changes.
To make the video accessible, the settings page offers the ability to specify Captions and Transcript values. When captions are configured the video player will present an option to turn captions on or off.
Captions utilize Web Video Text Tracks Format (WebVTT) format and its input form offers an ability to prefill an example in WebVTT format by clicking Add Example button above the Captions input field.
Tips
Configure the video size by dragging the button on the bottom-right corner of the video. After resizing, click the Save Changes button to persist the new dimensions.
Trainees can also resize videos, and their personalized configurations will be automatically saved in the browser's local storage and will take priority over the default.
Audio
Users can upload audio files by navigating to Project -> Subject -> Skill -> Audio/Video and selecting the desired file using the Browse button or drag-n-drop functionality.
The following audio formats are supported:
- WAV
- MPEG
- MP4
- AAC
- AACP
- OGG
- WEBM
- FLAC
The Audio/Video settings also provide an option to add a Transcript, enhancing accessibility for users.
Achieving Skills through Audio/Video Playback
Once the Audio/Video settings are specified, the skill can be configured to be achieved after the trainee has watched or listened to the entire audio/video clip (>96%). This is done using the Self Reporting mechanism, which can be easily selected by editing the skill and choosing the Audio/Video Self Reporting type.
Additionally, if a transcript is configured for the audio/video, users can also earn the skill by reading the transcript and self-certifying to receive credit.
Expire Points and Achievements
Skills can be configured to expire points and achievements on either a scheduled and recurring basis for all users, or based on usage after a user achieves the skill.
To configure a skill for expiration, please navigate to Project -> Subject -> Skill -> Expiration
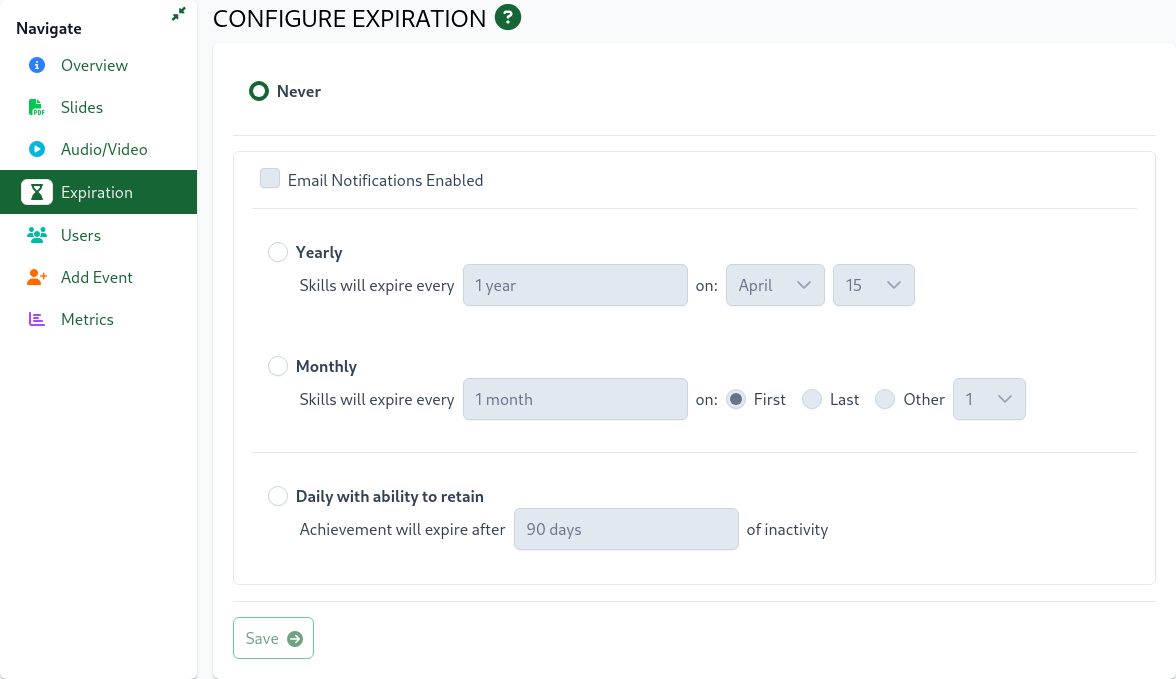
The default option for all skills is set to Never, so that the skill will never expire any points or achievements.
The Yearly and Monthly options allow for the skill to be configured to expire on a recurring basis. For example, you can configure a skill so that all user's points and achievements earned for this skill will be removed annually on December 31st.
The Daily with the ability to retain option configures skills to expire based on user activity. After achieving this skill, users must continue performing it within the configured number of days to maintain their points. Each time the skill is performed, the timer resets, requiring users to repeat the skill within the specified timeframe to keep their earned points."
Expiration Notifications
Skills that are configured to expire will have warnings visualized in the Skills Display, letting the user know when the skill will is set to expire.
Additionally, you can enable email notifications to alert users when their skills are about to expire or have expired. The Email Notifications Enabled checkbox allows you to:
- Send automatic email notifications to users when their skills are approaching expiration
- Provide users with advance warning so they can take action to maintain their skill achievements
- Ensure users stay informed about the status of their expiring skills
When enabled, users will receive different types of email notifications based on the expiration configuration:
For skills configured with Monthly or Yearly expiration, users receive notifications after their achievements have expired. These notifications inform users that their skill achievements have been removed and provide information about the next scheduled expiration date.
For skills configured with Daily with ability to retain, users receive warning notifications before their achievements expire. These notifications:
- Are sent when a user's achievement is approaching expiration
- Include the number of days remaining until expiration
- Provide a retention deadline so users can take action to maintain their achievements
- Are only sent once per expiration cycle to avoid notification fatigue
This differentiated approach ensures users receive timely and relevant notifications based on their skill expiration configuration.
Expiration History
A history of skills that have been expired can be viewed from the Skill Expiration History table on the Project page. This table will allow you to view the skill, the user associated and the date it expired.
Skills Definition Export
To export the skills table to Excel, click the Export All Skills button located at the top right of the table. This will generate an Excel file containing all skills for the current subject.
Important Export Details:
- All skills under a subject are included in the export, including those within Skill Groups.
- Skill Groups are not exported as separate rows, but their associated skills will include the group name in each row.
- Descriptions are not included in the export due to their complex formatting, which includes rich text, HTML, and embedded images that are not compatible with Excel cells.
Copy Skill
To use an existing Skill as a template for a new Skill, you can use the  button available on a Skill row displayed on the Subject page. This will open a new Skill dialog populated with the details of the selected copy-from Skill. The name and id will be prepended with
 Copy of which can be changed before the new Skill is saved. Saving this dialog will create a new Skill that falls within the same Subject as the copy-from Skill.
Tips
Follow a 2-step process if you want to "copy" a skill into a different subject or group
- copy the skill
- Move the skill into another subject or group.
Skills Versioning
Skill versioning is a mechanism that allows the addition of new skills without affecting existing software running with an older skill profile. Versioning is mostly pertinent to the Display Libraries that visualize the skill profile for the version they were declared with.
Here are simple steps to enable Skills Versioning in your application:
- When creating a skill, specify a target version (always last deployed version + 1)
- Version selection can be found on the top-right in the create/edit skills dialogue
- When initializing the display component, provide the latest target version for that instance.
Let's walk through a simple scenario to get a better understanding of how Skill Versioning operates.
We have developed software and are releasing a version 0 that integrates skills display and event reporting using the Vue.js library. In the initial release, all of the skills will be created with version 0. The integrated display component will then be initialized with version 0, like this:
<skills-display version="0"/>
This software instance will then get deployed and the skill profile for version 0 is displayed.
Now we are working on the next release which we will label as version 1. Any skill created with version 1 will not be visible in the already deployed software, configured to visualize skills with version 0. The version will need to be updated in the integrated display component to use version 1, like this:
<skills-display version="1"/>
The updated software running the version 1 profile will expose skills declared with both version 0 and version 1. Both versions of software can then run simultaneously and each version will present its own gamification profile.
Please Note
The skills from previous versions are automatically included, so version 3 will contain skills declared with versions 3, 2, 1 and 0
Important
Conveniently, the Skills Dashboard provides a way to view the Client Display for a specific version. Navigate to Project -> User -> Client Display and then select a previous version on the drop-down located above the client display.
Limitations:
- Deletes are not directly supported. To remove a skill, please perform the following procedure:
- update all the client code that is reporting events for the skill that is to be deleted
- deploy the version that is not using the skill
- delete the skill using the dashboard
- Edits to skills are not versioned and will be immediately visible to any display with this or earlier versions. This is mostly likely the behavior you want as any edit to a skill is a fix or an improvement.
- Versioning is only applicable to new skills and doesn't apply to operations done on subjects, badges or other items within the gamificiation framework.
Manually Report Skills
There may be special situations where you need to credit users explicitly. As a project administrator, you can manually report skill events across multiple skills for multiple users simultaneously. You can also specify the date against which those events are reported.
To manually report skills:
- Navigate to the subject page (
Project -> Subject). - Select one or more skills from the table using the checkboxes.
- Click the
Actionsbutton, then select theReport Skills for Usersoption. - Follow the step-by-step guidance in the skill reporting modal to complete the process.
Batch Skill Editing
As a project admin, you can bulk-edit attributes across multiple skills simultaneously. To bulk-edit multiple skills, navigate to a Subject page (Project -> Subject) or a Skill Group page (Project -> Subject -> Group) and select the checkboxes next to the skills you want to edit. Click on the Action button located on the top-right above the skills table and select the Batch Edit option. Select at least one of the following attributes to edit and then click the Update button.
The supported attributes for bulk-editing are:
| Property | Explanation |
|---|---|
| Point Increment | Number of points added for each skill event; used in conjunction with the 'Occurrences to Completion' property. |
| Occurrences to Completion | Number of successful occurrences required to fully accomplish this skill; used in conjunction with the 'Point Increment' property. |
| Time Window | Once the maximum occurrences limit is reached, points will not increment until the configured Time Window resets. Please note that only skills with Occurrences to Completion greater than 1 will be updated. |
| Self Reporting Type | Only Honor and Approval Queue are supported for batch updates. Other types require additional per-skill management. |
| Visibility | Only available if at least one selected skill has its visibility set to Hidden. |
Good To Know
Please note that you do not need to select all attributes; only configure the ones you want to change for the selected skills.
Tips
To learn more about these attributes and skills in general, please visit the Skills Section.
Incremental Changes
This section explain how various scenarios are handled when skills are modified/removed/added AFTER your application users already earned points, completed skills, achieved levels and obtained badges.
Overall Strategy
- Never take away achieved levels and/or earned badges.
- Re-calculate users' points when skill's points and/or occurrences are mutated.
SCENARIO: Point Increment is increased ⬆️
Recall that Point Increment is the number of points applied for each skill event. Delta in Point Increment will then be added for any of the already performed skill events. For example if a user performed 2 skill events and Point Increment changed from 5 points to 8 points (delta = 3) then user will be awarded additional 6 (3 * 2) points. If these additional points place a user into the next level then that level will be awarded the next time an event is reported for that user.
SCENARIO: Point Increment is increased ⬇️
Recall that Point Increment is the number of points applied for each skill event. Delta in Point Increment will then be substructed for any of the already performed skill events. For example if a user performed 2 skill events and Point Increment changed from 10 points to 6 points (delta = 4) then 8 (4 * 2) points will be substructed from the user's points.
SCENARIO: Occurrences to Completion is increased ⬆️
Recall that Occurrences to Completion is the number of successful occurrences to fully accomplish a skill. Any users that have already completed the skill based on the lower number of occurrences will now have an opportunity to complete new/additional occurrences and earn those points.
Additional occurrences will cause a completed skill to be worth additional points which in turn may shift the points profile of a user, technically placing certain users outside of their currently achieved level. If so, those users will NOT lose their current level (per our overall strategy) but rather it will take them a bit longer to achieve the next level.
If the increase to occurrences was made for a skill that belongs to a badge, then any user that has already earned that badge will retain the badge achievement.
SCENARIO: Occurrences to Completion is decreased ⬇️
Recall that Occurrences to Completion is the number of successful occurrences to fully accomplish a skill. Points are subtracted for users that already achieved the removed occurrences.
If the removal causes a user to qualify for achievement of the edited skill, then that completed skill is awarded to the user. Subsequently if the completion of that skill completes a badge then the badge is awarded to that user.
Any previously achieved levels and badges are retained even if the removed occurrences contributed to the achievement of those levels and/or badges.
SCENARIO: Skill is removed
For a given user, if this was the last skill to be completed before a badge is achieved then the badge is awarded to that user.
SCENARIO: Skill is added
New skill will equate to extra points which in turn may shift points profile which then may technically place certain users outside of their currently earned level. If so, those users will NOT lose their current level (per our overall strategy) but rather it will take them a bit longer to achieve the next level.
Same Project Skill Reuse
In-Project Skill Reuse allows you to reuse skills within the same project. A skill can be reused within another Subject or Skill Group.
Key behavior of reused skills:
- They are read-only copies and cannot be edited.
- Skill actions reported to the original skill propagate to reused copies.
- Changes to the original skill (e.g., description, occurrences) synchronize automatically.
To reuse a skill:
- Navigate to the Skills page (Project -> Subject).
- Select the skills you want to reuse.
- Click the Action button above the skills table.
- Select Reuse in this Project to initiate the process.
Once skills are reused, a REUSED tag will appear next to each copy.
Skill occurrences propagation
Please note that when skill occurrences are reported for an original skill, SkillTree checks whether that skill was reused. For every reused instance the occurrence is queued up to be propagated to that reused skills. The queue is handled in an asynchronous manner so there is a small delay before the skill occurrence are reflected in the reused skills.
Modify skill in the original project
Only the original skill can be updated. After the attributes of the original skill are mutated they are queued up to be propagated to all reused versions of the edited skill. Please note that skill attribute propagation is performed asynchronously, it may take a few moments for changes to appear in all reused skills.
Self Reporting and Reused Skills
As skill occurrences are reported to the original skill they are also automatically propagated to all reused copies. Generally skill occurrences are not allowed to be reported against a reused skill copy, after all it is meant to be read-only.
The one exception to this restriction is self-reported skills. Self-reported skills can be reported to the original skill OR to any of its reused copies. Regardless of whether it was reported against a reused copy or the natively declared skill, the points are applied to the original AND all of its copies (assuming points are due based on the current configuration and the reported user's prior contributions). When a self-reported skill occurrence is reported to the reused copy then the request is simply routed to the originally-declared skill. From there on the flow is identical to any skill occurrence that is being reported to the original skill and for every reused instance the occurrence is queued up to be propagated to that reused skills. The queue is handled in an asynchronous manner so there is a small delay before the skill occurrence are reflected in the reused skills.
The Self-reporting request points button is visualized for each reused skill in the Skills Display and Progress and Rankings views. Reused skills support all the self-reporting types (Honor System, Approval Queue, Quiz, and Survey), to learn more please visit the Self Reporting section.
Other Considerations
- Skills with dependencies can NOT be reused. Reused skills can NOT be added as a dependency.
- Reused skills cannot be added to a badge; use the original skill instead
- Removing the original skill will also delete all of its reused copies
Moving Skills
Moving skills allows project administrators to transfer skills within the same project.
Skills can be moved to:
- Another subject
- Another skill group
When skills are moved:
- Users keep earned points.
- Level-based achievements are recalculated.
- Recalculation applies to both source and destination.
The ability to move skills between subjects allows project administrators to refine their training profiles after initial creation.
To move one or more skills:
- Navigate to the Skills page (Project -> Subject).
- Select the skills you want to move.
- Click the Action button above the skills table.
- Select Move Skills to start the process.
Tips
Select all skills under a subject or group using the Select All button.
Note
You can also move entire Skill Groups. Visit the Moving Groups Section to learn more.
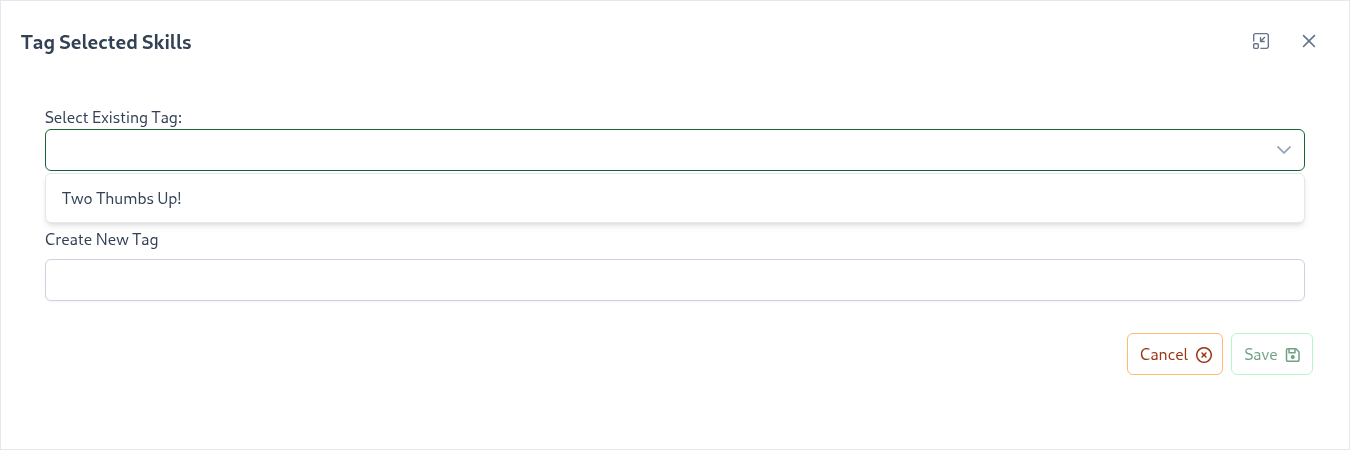
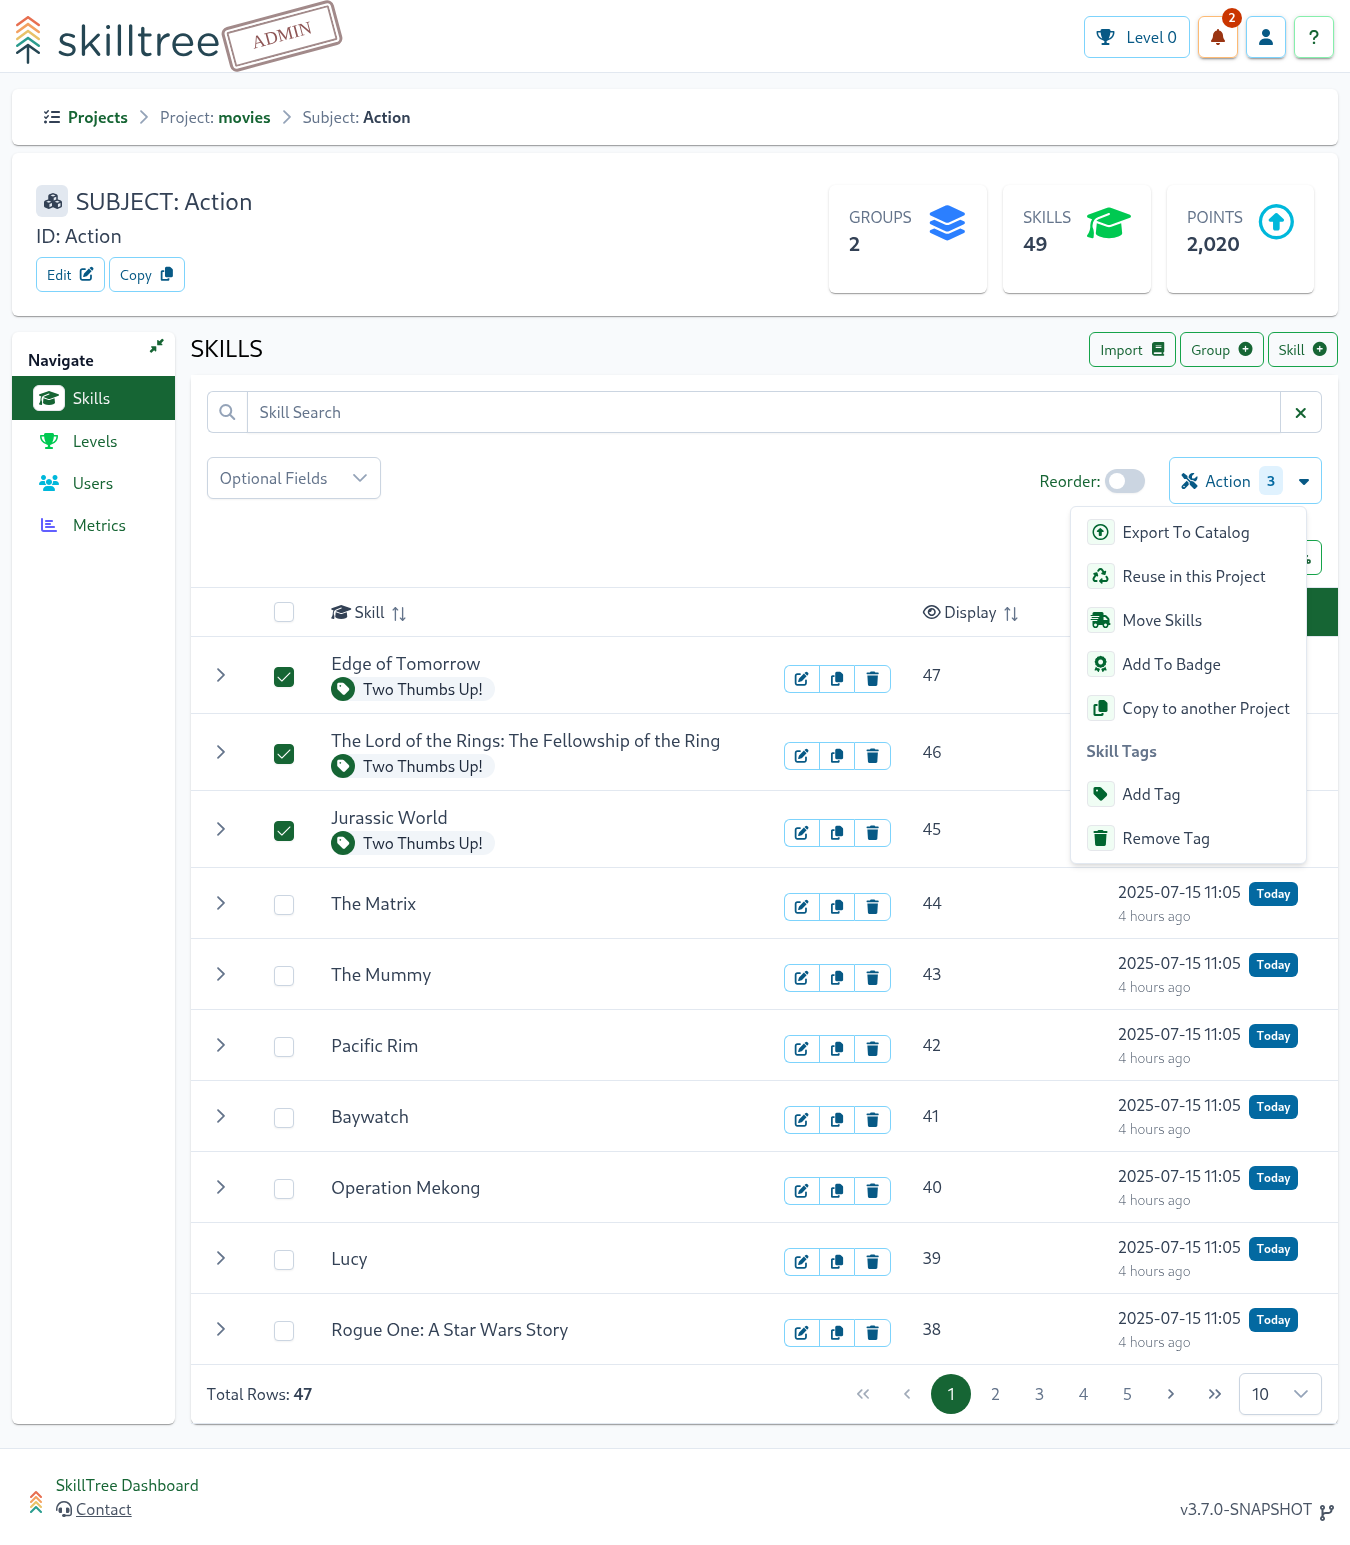
Skill Tags
Skill tagging is a feature that allows administrators to add one or more custom "tags" to skills. Adding tags to skills can help to categorize and group skills, giving users another way to search or filter a particular set of skills. Skill tags are visualized in the Skills Display to give users consuming the training another way to comprehend, categorize and filter skills.
To tag skills, navigate to the Skills page (Project -> Subject), then select skills to tag and click on the Action button located on the top-right above the skills' table. Select the Tag Skill button to initiate the process. After a tag has been added, it can be removed by selecting the skills you would like to remove the tag from, then click on the Action button, and then Remove Tags.
Tips
Once a skill tag is created, you can easily reuse it to tag other skills by selecting it from the Existing Tag drop down menu.